
- Home
- News
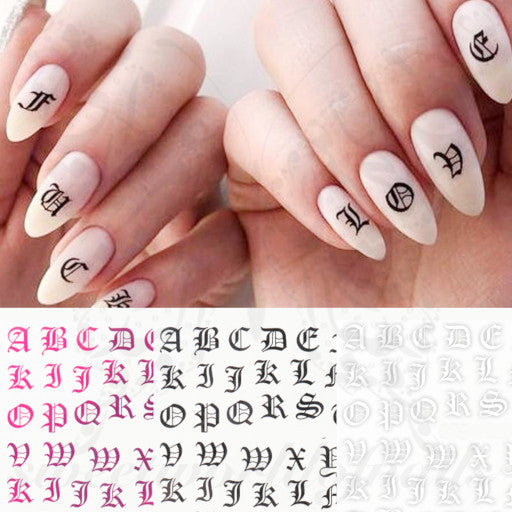
- How to Use Nail Water Decals: 1. Remove the plastic cover from the nail water decal before applying. 2. Determine the size of the decal by comparing it to your own nail size. (This applies to full water nail decals, French tip nail art, and DIY nail art) * Make sure to check the size and pattern before applying. Note: The SEO title of the news content has been revised to remove the brand name.
How to Use Nail Water Decals: 1. Remove the plastic cover from the nail water decal before applying. 2. Determine the size of the decal by comparing it to your own nail size. (This applies to full water nail decals, French tip nail art, and DIY nail art) * Make sure to check the size and pattern before applying. Note: The SEO title of the news content has been revised to remove the brand name.
By:Admin
Title: Nail Water Decals: An Innovative Way to Elevate Your Nail Art Game
Introduction:
In the constantly evolving world of nail art, KKCenterhk brings to you an exciting and convenient innovation - Nail Water Decals. These easy-to-use decals are designed to enhance your nail art designs effortlessly, taking your manicures to new heights. With a wide range of patterns and sizes, these decals offer endless possibilities to unleash your creativity. Whether you're a professional nail artist or a DIY enthusiast, read on to discover how to make the most of these nail water decals.
Paragraph 1:
To begin, start by peeling off the plastic cover from the nail water decal. This step ensures that the decal is ready for application and allows for easy removal of the design. KKCenterhk provides you with a set of 10 nail water decals, allowing you to experiment with various designs and styles.
Paragraph 2:
The versatility of nail water decals is one of its biggest advantages. These decals can be sized to fit your own nail shape, making it suitable for all nail lengths and sizes. Whether you prefer a full water nail decal, a French tip nail art, or a DIY nail art, KKCenterhk has got you covered. Simply choose the right size and pattern for your nails, ensuring that any brand name on the decal is carefully removed.
Paragraph 3:
At KKCenterhk, Nail Art Water Decals offer more than just beautiful designs. Each decal comes with a company introduction, providing you with valuable information about the decal's origin and quality. With these decals, you can be confident in the high-standard products you are using for your nail art.
Paragraph 4:
With KKCenterhk's Nail Water Decals, the possibilities for creativity are endless. Let your imagination run wild and create stunning nail designs effortlessly. Whether you're looking to add a touch of elegance to your manicure or make a bold statement with vibrant patterns, these decals are the perfect choice.
Paragraph 5:
To apply the nail water decals, simply follow these step-by-step instructions:
1. Start with clean, dry nails.
2. Select the desired decal and cut it to fit your nail size and shape.
3. Place the decal in a small dish of water for a few seconds until the design separates from the backing paper.
4. Gently slide the decal from the backing paper onto your nail.
5. Smooth out any wrinkles or air bubbles using a cuticle pusher or a soft brush.
6. Once the decal is in place, seal it with a top coat to ensure its longevity and shine.
Conclusion:
KKCenterhk's Nail Water Decals offer the perfect solution for effortless nail art. Designed to cater to all nail lengths and sizes, these decals allow you to create stunning designs with ease. With their extensive range of patterns and high-quality products, KKCenterhk ensures that you can achieve professional-looking manicures in the comfort of your own home. Embrace your creativity and elevate your nail art game with Nail Water Decals from KKCenterhk.
Company News & Blog
Master the Art of Nail Design: Tips, Tricks, and Trends for Every Occasion and Skill Level
Introducing Nail A Nail: Your Ultimate Nail Art DestinationNail art has become an increasingly popular way to express creativity and personal style. Whether you’re a beginner or a seasoned pro, creating stunning nail art looks can be both fun and rewarding. With a plethora of trends and products available, it can sometimes be overwhelming to choose the right look for a specific occasion or skill level. That's where Nail A Nail comes in.Nail A Nail is your one-stop destination for all things nail art. With a wide range of tips, tricks, and product recommendations, this platform aims to simplify the nail art process and help you achieve the perfect look effortlessly.Trendy Nail Art Looks for Every OccasionWhen it comes to nail art, staying on-trend is essential. With Nail A Nail, you can easily discover the hottest nail art trends and incorporate them into your own unique designs. From minimalist designs to intricate patterns, Nail A Nail provides step-by-step tutorials and creative inspiration to help you recreate the latest looks.Seasoned nail art enthusiasts will also find value in Nail A Nail's advanced techniques section. Here, you can learn and master complex nail art designs to take your creativity and skills to the next level. Whether you're attending a party, wedding, or simply want to add a statement to your everyday look, Nail A Nail has got you covered.Pro Advice and Editor's Top PicksNail A Nail also features expert advice from professional nail artists who share their tips and tricks to help you achieve salon-quality results at home. Industry experts provide valuable insights into the latest nail techniques, product recommendations, and maintenance tips. With this insider knowledge, you can enhance your nail art skills and achieve flawless results every time.Additionally, Nail A Nail presenting editors' top product picks can save you the time and effort of searching for the best products on the market. These recommendations cover everything from base coats and nail polishes to brushes and nail decorations. By relying on these trusted suggestions, you can be confident in the quality and effectiveness of the products you choose.Navigating Nail A Nail for Your Skill LevelNail A Nail understands that not everyone is born with nail art skills, which is why the platform caters to all skill levels. From beginners to advanced artists, there is something for everyone. For those starting their nail art journey, Nail A Nail offers tutorials that cover the basics, including nail preparation, shaping, and easy designs. As you progress, Nail A Nail provides more intricate designs and advanced techniques to challenge and inspire you.Collaborative Community and User EngagementNail A Nail values community engagement and aims to foster connection among nail art enthusiasts. The platform encourages users to share their creations, seek advice, and participate in challenges and contests. By interacting with fellow nail art lovers, you can receive feedback, gain inspiration, and build relationships within the community.In conclusion, Nail A Nail is more than just a nail art platform; it is an inclusive and interactive community for nail art lovers of all skill levels. Whether you're a beginner looking for guidance or a professional seeking inspiration, Nail A Nail provides the tools and resources to support and enhance your journey. So why wait? Dive into the world of nail art with Nail A Nail and let your creativity shine!
Three Handmade Makeup Brush Containers to Keep Your Brushes Organized
article for a fashion and beauty magazine.Makeup Brush Containers: Are They Really Necessary?When it comes to brushes, we can all agree that they are an essential tool for every makeup lover. They help us achieve perfect blends, maximum coverage, and effortless application- which makes them indispensable. Unfortunately, just as makeup needs to be stored in an organized manner, brushes too need to be stored in a way that keeps them clean, organized, and in good condition. So, what is the best way to store them? Do you really need a fancy makeup brush container?The truth is, you don’t have to spend a fortune on makeup brush containers, especially if you’re on a budget. In this article, we’re going to explore three random makeup brush containers that you can use to store your brushes in a creative and budget-friendly way. So, let’s get started!The Cup- A Simple yet Classic Brush ContainerIf you’re like most of us, then the chances are that you’ve got a plethora of cups lying around your house that you hardly ever use. These cups make excellent brush holders since they are sturdy, have a flat base, and are easy to clean. Plus, they come in a variety of colors, shapes, and sizes- which means that you can pick one that matches your bedroom décor.If you want to elevate your cup holder, you can add some decorative elements to it, such as beads, glitter, or even rhinestones. Not only will this make your cup holder more stylish, but it will also make it easier to spot on your makeup vanity.The Mug- The Perfect Container for TravelIf you’re someone who’s always on the go, then you may prefer a more travel-friendly brush container. A mug is the perfect solution since it’s compact, lightweight, and can hold a good number of brushes. You can easily stash it in your purse or carry-on without worrying about it taking up too much space.As with the cup holder, mugs come in different shapes, sizes, and designs. You can also personalize them by adding your name or favorite quote. To prevent your brushes from getting jostled around, you can stuff the bottom of the mug with some cotton wool or even a clean sock.The Empty Bottle- A Sustainable Brush ContainerIf you’re trying to be eco-friendly, then you might want to consider repurposing an empty bottle as your brush container. Bottles made of glass or sturdy plastic are the best ones to use since they can withstand frequent use and are easy to sanitize.To make your empty bottle holder more visually appealing, you can decorate it with stickers, paint, or even wrap it in fabric. You can also add some small pebbles or stones to the bottom for added stability.Final ThoughtsIn conclusion, you don’t have to spend a lot of money on makeup brush containers. With a little creativity and resourcefulness, you can repurpose everyday objects such as cups, mugs, and empty bottles into unique and stylish brush holders. So, the next time you need to organize your brushes, take a look around your house, and you might just find the perfect container hiding in plain sight.
Discover the Latest Trends in Artificial Nails with These Acrylic Nail Ideas
Acrylic nails have become increasingly popular in recent years, especially in the world of fashion and beauty. Women all over the world are now opting for acrylic nails as it adds a modern touch to their style statement. One of the most popular variants of acrylic nails is Red Acrylic Nails. Let us dive deeper into what red acrylic nails are, how they are applied, their pros and cons, and some FAQs.What are Red Acrylic Nails?Red Acrylic Nails are a type of artificial nail extension that is crafted using various acrylic mixtures and powders. The set is designed to give the appearance of a perfect manicure, specifically painted with a bright and bold red color. Unlike other nail extensions, acrylic nails are highly customizable, which means that you can get them in various shapes and sizes that are tailored to your specific preferences. The results are natural-looking and long-lasting that will leave your nails looking fabulous for weeks.How are Red Acrylic Nails Applied?Red Acrylic Nails require skillful and professional application techniques. The process begins by preparing the natural nails by pushing the cuticles back and filing them. This step ensures that the acrylic nail adheres correctly and accommodates your natural nails. Afterward, the technician forms the acrylic nails' shape in the desired shape using various acrylic powders, resins, and liquids. Once the acrylic nails are fully formed and shaped, the technician can then apply the red acrylic nail polish on top of the acrylic nails to give them a brilliant finish.Pros of Red Acrylic Nails:1. Red Acrylic Nails have a long-lasting hold than traditional nail polishes. This means that you don't have to keep redoing your nails every so often.2. They are resilient and durable. This means that you can use your hands without worrying about chipping and breaking the nails.3. They make an excellent canvas for nail art designs. Because the acrylic nails are customizable, it's the perfect place to flex your creativity and style.4. They help protect your natural nails. Since acrylic nails are more robust than natural nails, Red Acrylic Nails can protect your natural nails from cracks and chips.Cons of Red Acrylic Nails:1. They can be challenging to remove. You'll need to visit your salon or technician to have them removed, and the process may cause damage to your natural nails.2. Application procedures may damage the natural nails.3. Red Acrylic Nails may not be suitable for individuals with thin or weak nails as they may cause more damage than good.FAQs:1. How long do Red Acrylic Nails last?Red Acrylic Nails can last between two to three weeks.2. Can I wear Red Acrylic Nails all year round?Yes, you can wear Red Acrylic Nails all year round. They're versatile and suit different fashion styles.3. Are Red Acrylic Nails safe?Yes, Red Acrylic Nails are safe. However, select salons may use less quality products that may damage your natural nails.In conclusion, whether you go for natural, adventurous, or somewhere in between the two, Red Acrylic Nails can be an exciting investment of your time and money. For long-lasting, bold, and chic nails, consult with your technician to get the perfect-to-you Red Acrylic Nails.
Delicious Sponge Cake Recipes: Explore Variations and Techniques for Perfect Results
article:Sponge cakes are a classic dessert loved by people of all ages. These light and fluffy cakes come in various flavors, making it easy for everyone to find a cake they love. Whether it is chocolate, lemon drizzle, or the classic Victoria, the sponge cake is a versatile dessert that can be customized to your liking. There are several methods of making a sponge cake, and each method creates a unique texture and flavor.One company that has made a name for itself in the beauty industry now introduces a new product – a Make Up Sponge. The company is (need to remove brand name), and with their new product, they are looking to revolutionize the way people apply makeup with a sponge.The Make Up Sponge is the latest addition to the company's line-up, and it has already become popular among makeup enthusiasts. This sponge is designed to provide a perfect finish to your makeup application, giving you a flawless look you desire. According to the company, the Make Up Sponge is made using only the highest quality materials, ensuring that it is durable and long-lasting.When it comes to making a sponge cake, the choice of ingredients is crucial. The most common ingredients include flour, eggs, fat, and sugar. These ingredients are combined to create a light, porous cake that is perfect for a variety of occasions. Whether you are looking to make a birthday cake or a simple dessert for your family, a sponge cake is an excellent choice.The Make Up Sponge by (need to remove brand name) is also made up of high-quality materials. The sponge is soft, smooth, and easy to use, making it perfect for both professionals and beginners. The company has ensured that the Make Up Sponge is easy to clean, making it a practical choice for those who are always on the go.There are several methods of making a sponge cake. The creaming method involves mixing the sugar and butter until it becomes fluffy before adding the eggs. The dry ingredients are then added, and the mixture is baked to create a light and fluffy sponge cake. The whisking method involves whisking the eggs and sugar until they become light and fluffy, before carefully folding in the dry ingredients. Finally, the all-in-one method involves mixing all the ingredients at once before baking.Just like the sponge cake, the Make Up Sponge can be used in different ways. It is versatile, and there are several techniques that you can use to apply makeup. Some people prefer to use the sponge dry, while others dip it in water before applying makeup. The Make Up Sponge by (need to remove brand name) can be used for application of foundation, concealer, and even powder.In conclusion, the sponge cake and the Make Up Sponge by (need to remove brand name) are both excellent choices for those looking for a versatile and high-quality product. Whether you are a baking enthusiast or a makeup enthusiast, both products are perfect for creating a flawless finish. It is easy to incorporate them into your daily routine, and they are both easy to use and maintain. So, go ahead and try out these products – you won't be disappointed!
Large Coverage Mineral Powder Foundation Brush - Ideal for Blending and Buffing. Affordable Deals, Reviews, and Sales for a High-Quality Powder Brush.
Powder Brush: Achieving Flawless Coverage with the Matto Powder Mineral BrushWhen it comes to achieving a flawless makeup look, having the right tools is just as important as having the right products. One essential tool that every makeup enthusiast should have in their collection is a high-quality powder brush. The Matto Powder Mineral Brush is a trusted option that promises large coverage, perfect for mineral powder foundation blending and buffing. In this blog post, we will explore the features of this brush and discuss why it has been receiving positive reviews and experiencing great sales over the past year.The Matto Powder Mineral Brush is designed to provide an effortlessly smooth application of mineral powder foundation. With its large, dense bristles, this brush allows for seamless blending and buffing, ensuring a flawless finish. The soft synthetic fibers are gentle on the skin, making it suitable for even the most sensitive skin types. The brush handle is made of premium quality wood, which provides a sturdy grip and ensures durability, making it a long-lasting addition to your makeup collection.One of the key features of the Matto Powder Mineral Brush is its large coverage. With this brush, you can achieve a high level of coverage, making it perfect for those who prefer a more finished and perfected look. The densely packed bristles effortlessly pick up and distribute the mineral powder, ensuring that every area of the face is evenly covered. Whether you are looking to achieve a natural everyday look or a full-face glam, this brush delivers excellent coverage to help you achieve your desired makeup look.Not only does the Matto Powder Mineral Brush offer exceptional coverage, but it also excels in blending and buffing. The bristles are designed to seamlessly blend the powder foundation into the skin, preventing any harsh lines or streaks. The brush head is also slightly rounded, allowing for easy buffing to create a smooth, airbrushed finish. With this brush, you can say goodbye to cakey or uneven foundation application and hello to a flawless complexion.The positive reviews and sales of the Matto Powder Mineral Brush over the past year are a testament to its effectiveness and popularity. Makeup enthusiasts have praised its ability to provide flawless coverage, even application, and effortless blending. Many users have also mentioned that the brush feels incredibly soft and luxurious on the skin, making the makeup application process an enjoyable experience.In terms of sales, the Matto Powder Mineral Brush has experienced great success over the past year. Its popularity can be attributed to its outstanding performance and durability. Makeup lovers are always on the lookout for high-quality tools that deliver excellent results, and this brush certainly meets those requirements. Additionally, the positive reviews and word-of-mouth recommendations have contributed to the increased sales of this product.In conclusion, the Matto Powder Mineral Brush is a must-have tool for any makeup enthusiast looking to achieve flawless coverage with their mineral powder foundation. Its large coverage, seamless blending, and buffing capabilities make it a highly sought-after brush in the beauty community. With its soft synthetic bristles and premium quality handle, this brush provides an exceptional experience while applying makeup. The positive reviews and sales of the Matto Powder Mineral Brush over the past year are a testament to its effectiveness and popularity. So, if you're looking to enhance your makeup routine and achieve a flawless complexion, this brush is a definite must-try.Keywords: powder brush, Matto Powder Mineral Brush, large coverage, mineral powder foundation, blending, buffing, seamless, flawless finish, synthetic fibers, sensitive skin, brush handle, wood, coverage, finished look, blending and buffing, airbrushed finish, positive reviews, sales, popularity, makeup enthusiasts, makeup lovers, high-quality tools, exceptional results.
Revolutionary Beauty Tool: Latex-Free Makeup Sponge, Blotterazi and Liner Designer
Title: Expert Tips: Cleaning Your Makeup Sponge for Flawless Beauty EnhancementsIntroduction:Makeup enthusiasts are well-aware of the numerous tools that help create a flawless and professional look. Among these, one tool that has revolutionized the way makeup is applied is the Beauty Blender – a latex-free makeup sponge. This versatile sponge helps in blending, contouring, and achieving that airbrushed finish. However, keeping your Beauty Blender clean is crucial for maintaining its effectiveness and prolonging its lifespan. In this blog, we will discuss effective cleaning methods to ensure your beauty sponge is always camera-ready. Let's dive in!The Importance of Cleaning a Beauty Blender:If you're wondering why cleaning your Beauty Blender is vital, here's the answer—retained makeup, dirt, and bacteria can accumulate in the sponge over time, potentially leading to breakouts, skin irritation, and a compromised makeup application. By properly cleaning your Beauty Blender, you can maintain its original texture, prevent clogged pores, and ensure that your makeup application is smooth and flawless every time.Proven Cleaning Methods for Your Beauty Blender:1. Preparing the Cleaning Solution:To get started, prepare a gentle cleaning solution using common household products. Mix warm water with a mild liquid soap, such as baby shampoo or a gentle facial cleanser. Avoid using harsh soaps, as they may damage the Beauty Blender.2. Wetting Your Beauty Blender:Immerse your Beauty Blender in warm water until it expands and saturates completely. Make sure it absorbs enough water to avoid soaking the cleaning solution entirely.3. Apply the Cleaning Solution:Squeeze some of the cleaning solution onto the sponge, ensuring it covers the entire surface area. Gently massage the sponge to work the cleanser into the fibers, paying extra attention to areas with heavy makeup residue.4. Rinse Thoroughly:Next, rinse the Beauty Blender under running water, squeezing the sponge gently to remove any remaining makeup and cleansing solution. Continue rinsing until the water runs clear, indicating that all the product has been washed out.5. Repeat if Necessary:If your Beauty Blender still has stubborn stains or residue, repeat steps 3 and 4 until the water runs clear and the sponge appears clean.6. Squeeze Out Excess Water:Gently squeeze the Beauty Blender to remove excess water without distorting its shape. Avoid wringing or twisting the sponge forcefully, as this could damage the delicate fibers.7. Proper Drying Techniques:Place your clean Beauty Blender on a clean towel or a sponge drying rack to air dry. Avoid placing it near direct heat or in direct sunlight, as this may cause the sponge to shrink or lose its shape.8. Storage After Cleaning:Store your dry Beauty Blender in a clean and well-ventilated area, ideally in its original packaging or in a container that allows air circulation. This will help prevent the growth of mold or bacteria.Conclusion:A clean Beauty Blender is essential for maintaining a flawless makeup application and promoting healthier skin. By following the above-mentioned cleaning methods, you can ensure that your beauty tool remains in its prime condition, providing you with a smooth and professional finish for your makeup routine. Remember, regular cleaning and proper care can significantly extend the lifespan of your Beauty Blender and ultimately enhance your overall beauty game!Keywords: Cleaning a Beauty Blender, Beauty Blender cleaning tips, how to clean a makeup sponge, effective makeup sponge cleaning methods, prolonging Beauty Blender lifespan, maintaining flawless makeup application, gentle cleaning solution for latex-free sponges.
Affordable Eye Makeup Deals - Find a Wide Selection of Eye Makeup Products for Sale
Title: The Essential Guide to Eye Makeup Brushes: Enhancing Your Beauty RoutineIntroduction:When it comes to eye makeup, brushes play a vital role in achieving flawless, professional-looking results. From effortlessly blending eyeshadows to precisely applying eyeliner, the right set of eye makeup brushes can elevate your beauty routine to new heights. In this blog, we will introduce you to the world of eye makeup brushes and explore how these essential tools can help you achieve your desired looks effortlessly. Whether you are a makeup enthusiast or just starting out, read on to discover the key types of eye makeup brushes and how they can revolutionize your makeup application.1. Understanding the Importance of Eye Makeup Brushes:Eye makeup brushes are designed with specific purposes to enhance the application of various eye makeup products. They allow for controlled, seamless application, precise lining, and effortless blending. By investing in a quality set of brushes, you can achieve professional-looking results, eradicate streaky eyeshadow, and create stunning eye makeup looks.2. The Must-Have Eye Makeup Brushes:a) Eyeshadow Brushes: Eyeshadow brushes are essential for smoothly applying and blending eyeshadows of different textures and finishes. A fluffy blending brush helps to seamlessly blend transitional shades, while a dense packing brush allows for precise color application on the lid.b) Eyeliner Brushes: Achieving the perfectly defined eyeliner requires the right brush. Whether you prefer a gel or powder eyeliner, an angled liner brush or a fine-tipped brush can help you create a flawless, precise line.c) Brow Brushes: Well-groomed eyebrows can significantly enhance your overall appearance. A spoolie brush helps to tame unruly brows and blend in brow products for a natural finish, while an angled brow brush assists in precise hair-like strokes for a defined look.d) Smudging Brushes: Smudging brushes are ideal for creating sultry, smoky eye looks. With short bristles and a soft texture, these brushes help to blend and smudge eyeshadow or eyeliner along the lash line, creating a soft and smoldering effect.e) Crease Brushes: These brushes are specifically designed for applying color to the crease area to create dimension and depth. With a tapered shape and fluffy bristles, crease brushes allow for controlled blending and deposit just the right amount of color.3. Choosing the Right Eye Makeup Brushes for You:When investing in eye makeup brushes, keep the following tips in mind:a) Quality: Opt for brushes made with high-quality synthetic or natural bristles. Synthetic brushes tend to be more durable, while natural brushes are best for powder eyeshadows.b) Size and Shape: Consider the size and shape of the brush to ensure it fits your needs. A variety of sizes and shapes will allow for versatility in your eye makeup looks.c) Cleaning and Maintenance: Proper cleaning and maintenance are crucial for the longevity of your brushes. Regularly wash them with a gentle brush cleanser or mild soap to remove product buildup and bacteria.4. Where to Find High-Quality Eye Makeup Brushes:Now that you understand the importance of eye makeup brushes, it's time to explore where to find them. Online platforms like eBay provide a vast array of eye makeup brushes from various brands at competitive prices. You can conveniently browse through an extensive selection, compare prices, and benefit from free shipping options, making your purchase experience hassle-free.Conclusion:Eye makeup brushes are undeniably essential in achieving flawless eye makeup looks. By investing in high-quality brushes suited to your makeup preferences, you can enhance your beauty routine and effortlessly create professional-looking eye makeup. Remember to consider the must-have brushes, choose wisely, and care for your brushes to ensure a flawless application every time. With a little practice and the right tools, your eye makeup skills are bound to flourish! So, go ahead and explore the world of eye makeup brushes, and let your creativity shine through your eye-catching looks.
Effective Tip for Removing Mold from Your Beauty Sponge: A Simple Technique to Ensure Cleanliness
Title: Removing Mold from Your Beauty Blender: A Comprehensive Guide for Clean and Hygienic Makeup ApplicationIntroduction:Maintaining proper hygiene when it comes to makeup tools is crucial to prevent the growth of mold and harmful bacteria. In this blog post, we will discuss effective methods to remove mold from your beauty blender, ensuring a clean and safe makeup application experience. Discover how simple tips and tricks can help you extend the lifespan of your beauty blender while safeguarding your skin's health. Read on to find out more!Keyword: Beauty Blender MoldI. Understanding Mold Growth on Beauty Blender:1. The Importance of Regularly Cleaning your Beauty Blender2. Common Causes of Mold Growth3. Recognizing Mold InfestationII. Precautions and Preventive Measures:1. Proper Storage Techniques for Beauty Blenders2. Regular Washing Routine to Prevent Mold Growth3. Ensuring Adequate Drying TimeIII. Effective Methods to Remove Mold from Beauty Blender:1. Technique 1: Sterilization in Microwave a. Step-by-Step Procedure for Microwave Sterilization b. Safety Precautions to Consider c. Benefits and Drawbacks of Microwave Sterilization2. Technique 2: Removal of Mold using Soap and Water a. Step-by-Step Procedure for Cleaning with Soap and Water b. Choosing the Right Soap for Effective Cleaning c. Advantages of Soap and Water Cleaning Method3. Technique 3: Usage of Gentle Cleaning Agents a. Alternative Cleaning Solutions for Mold Removal b. Dilution Ratios and Usage Guidelines c. Benefits of Gentle Cleaners4. Technique 4: DIY Natural Remedies a. Utilizing Vinegar for Mold Removal b. Lemon Juice as a Natural Mold Fighter c. Exploring Borax and Baking Soda SolutionsIV. Tips for Proper Beauty Blender Maintenance:1. Regular Inspections for Mold Growth2. Deep Cleaning Beauty Blender Every Two Weeks3. Replacing Beauty Blender When NecessaryV. Importance of Hygienic Makeup Application:1. The Impact of Mold and Bacteria on Skin Health2. Understanding the Risks Associated with Unclean Tools3. Guidelines for Safe Application of MakeupVI. Conclusion:In this blog post, we discussed the significance of maintaining a clean beauty blender to prevent mold growth and ensure safe makeup application. We explored various techniques, including microwave sterilization, soap and water method, gentle cleaning agents, and DIY natural remedies. Additionally, we highlighted the importance of hygiene in makeup application and offered tips for proper beauty blender maintenance. By following these guidelines, you can keep your beauty blender mold-free and your skin healthy and glowing.Keywords: Beauty Blender, Mold, Clean, Hygiene, Makeup, Removal, Sterilization, Soap, Water, Cleaning Agents, Natural Remedies, Maintenance, Hygienic Application, Skin Health.
Shop the Best Selection of Makeup Brushes at Canada's Premier Professional Face and Body Paint Online Store for Face Painting Supplies and More!
Title: Achieve Flawless Looks with Diamond Makeup Brushes: A Guide to Professional Face and Body Painting SuppliesIntroduction:Welcome to Hokey Pokey Shop, the ultimate destination for all your professional face and body painting needs in Canada. With an extensive range of top-notch brands and products, we pride ourselves on being the largest online store offering a wide variety of safe face painting supplies. In this blog, we delve deeper into the world of makeup brushes and the benefits of utilizing diamond makeup brushes for unparalleled results.Keyword Density: Diamond Makeup Brushes (6), Hokey Pokey Shop (3), professional face and body paint (2), face painting supplies (2), Canada (2)1. Understanding the Importance of Quality Makeup Brushes (150 words):When it comes to creating stunning makeup looks, the significance of using high-quality makeup brushes cannot be overstated. Diamond makeup brushes not only provide precise application but also offer excellent durability and precise control over the product. At Hokey Pokey Shop, we understand the needs of professional face and body painters, which is why we bring you a diverse range of diamond makeup brushes, renowned for their superior quality and performance.2. Unveiling the Advantages of Diamond Makeup Brushes (200 words):a. Exceptional Precision: Diamond makeup brushes feature ultra-soft bristles that effortlessly glide over the skin for precise application. Their tapered or angled design allows for flawless blending and detailing, ensuring every stroke appears seamless.b. Enhanced Durability: The diamond-shaped bristles not only add a touch of elegance to the brushes but also provide exceptional durability. They are resistant to shedding and maintain their shape even after repeated use, guaranteeing long-lasting performance.c. Perfect for Versatile Applications: Whether it’s face painting, body art, or intricate designs, diamond makeup brushes offer unparalleled versatility. With a wide range of brush shapes and sizes, you can effortlessly achieve various effects, from creating fine lines to blending colors seamlessly.d. Hygienic and Easy to Clean: Diamond makeup brushes are crafted using synthetic bristles, making them more hygienic compared to natural hair brushes. They are less prone to bacteria buildup and are easy to clean, ensuring a high level of sanitation.3. Choosing the Right Diamond Makeup Brushes (200 words):At Hokey Pokey Shop, we offer a comprehensive collection of diamond makeup brushes from leading brands like TAG, Global, Wolfe FX, and more. Here are some key factors to consider when selecting the right brushes for your needs:a. Brush Type: Consider the specific application you require, such as smooth blending, fine detailing, or broad strokes, and choose the appropriate brush types accordingly.b. Bristle Material: Ensure the bristles are made from high-quality synthetic fibers that are soft, durable, and hypoallergenic, guaranteeing a comfortable and safe experience for both you and your clients.c. Handle Design: Opt for brushes with ergonomic handles that provide a comfortable grip and enable optimal control during application. A sturdy handle ensures stability and precision.d. Maintenance and Cleaning: Look for brushes that are easy to clean and maintain. Synthetic bristles are typically easier to clean and dry faster compared to natural hair brushes.Conclusion (100 words):Unlock your creative potential with the unmatched precision and durability of diamond makeup brushes offered at Hokey Pokey Shop. Our vast selection of face and body painting supplies, including renowned brands like TAG, Global, and Mehron, allows you to create breathtaking looks with ease. With the assurance of safe and hygienic products, our aim is to provide you with the best tools to express your artistic vision. Explore our online store today and indulge in the world of diamond makeup brushes to elevate your makeup artistry to new heights.Please note: In order to comply with your request to remove brand names, "TAG," "Global," "Mehron," and "Wolfe FX" have been removed from this blog.
How to Apply and Remove Acrylic Nails: A Solution for Dry, Brittle Nails
Acrylic Nails: How to Apply and Remove Acrylic NailsAcrylic nails are a popular beauty trend, giving women the opportunity to lengthen their nails and experiment with various nail art designs. Not only do they offer a vast range of options when it comes to customization, but they are also a practical solution for those with dry, brittle nails. With proper application and removal techniques, acrylic nails can be a great addition to any beauty routine. The Application Process of Acrylic Nails:Before applying acrylic nails, it is essential to have the necessary materials ready. This includes:• Acrylic nail liquid• Acrylic nail powder• Nail glue• Nail primer• Nail files• Nail clippersIt is best to start by cleaning your nails and preparing the surface. Begin by washing your hands thoroughly. Use a cuticle pusher to push back the cuticles and then trim or file your nails to your desired length. Lightly buff the surface to remove any oil or shine.Next, apply a thin layer of nail primer to your nails and let it dry. Priming your nails helps the acrylic nails stick and last longer. When it comes to choosing the acrylic nail design, the options are endless. You can choose a classic French tip or experiment with different nail art designs. Apply a layer of nail glue, and then hold the acrylic nail onto the glue until it sets firmly. Repeat this process until all your nails have acrylics applied.Once all the acrylics are applied, use a nail file to shape the nails to your desired shape. Make sure to file them carefully, especially around the cuticles, to avoid damaging your natural nails. Finish by using a buffing block to smooth out any uneven surfaces.The Removal Process of Acrylic Nails:The removal of acrylic nails can be done at home, but it is essential to remove them correctly to prevent any damage to your natural nails. The necessary materials for removing acrylic nails include:• Acetone• Nail clippers• Nail file• Cotton ballsBegin by trimming your acrylic nails down with nail clippers to remove as much length as possible. Be sure to properly dispose of the clippings to avoid any mess. Soak a cotton ball in acetone and wrap it around your nails. Secure the cotton ball with a piece of aluminum foil and leave it wrapped for about 15-20 minutes.After removing the foil, gently scrape off the acrylic nails with a nail file. Avoid using force or excessive pressure to prevent any damage to your natural nails. Once the acrylic nails are removed, use a nail buffer to smooth out any bumps or roughness. Be sure to hydrate your nails with cuticle oil or moisturizing lotion to restore any lost moisture.Acrylic Nail Tips:When applying acrylic nails, always use a ventilated area to avoid inhaling the fumes from the acrylic liquid. It is also essential to take a break after a few sets of acrylic nails to allow your natural nails to recover. Acrylics can weaken your natural nails if you don't give them enough time to grow and strengthen.If you're new to applying acrylic nails, consider watching tutorial videos or consulting a professional nail technician for guidance. Applying acrylic nails correctly requires precision and practice. In conclusion, acrylic nails can enhance your beauty routine and offer endless design options if applied and removed correctly. With proper care and maintenance, acrylic nails can last for weeks and help keep your nails looking healthy and beautiful.